Asazuke
浅漬け
Asazuke is a Japanese word which means “shallow pickling.” My first memory of this dish was when I was a child, seeing this clay crock in the basement with a rock on top. Inside, Mom was making what she called her “cabbage pickle” which she has eaten at least once a day, for over eighty five years.
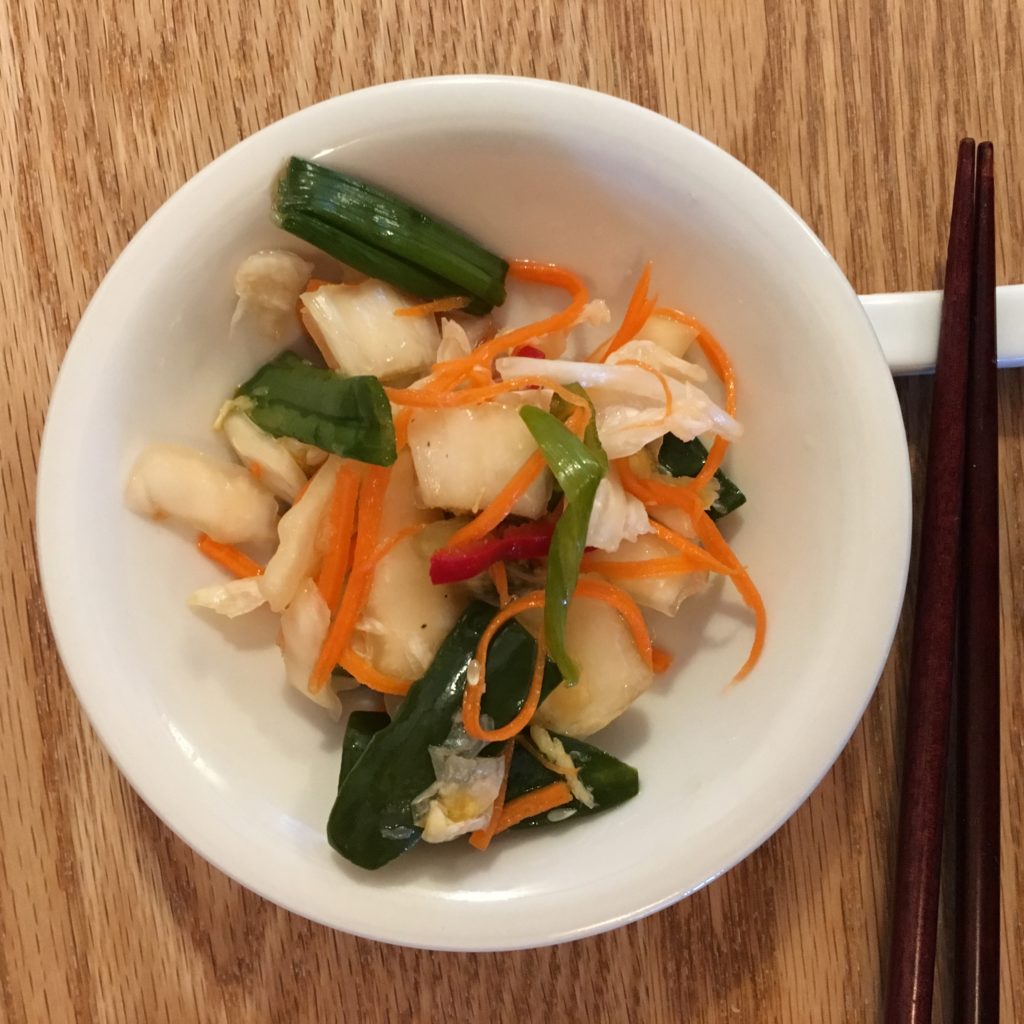
In Japan, a small dish of pickles and some rice are so commonly served with almost all meals, that a quick pickling method comes in quite handy. What Mom made by the crock, I usually make a few quarts at a time and it lasts me a week or two. It also makes a great healthy stand-alone snack mid-afternoon.
My recipe varies from the traditional recipe because I often eat it at my desk at work and so I keep it a bit milder in order to avoid offending my American colleagues with the aromas of daikon and dashi. Variations are noted below.
You will need:
A very large bowl for mixing, at least 12 quarts capacity
6 clean, sanitized quart size canning jars with lids
Glass jar followers (to hold the pickle beneath the brine)
A tamper or other 1-2″ round rod shaped tool
The Quantity:
This recipe has a lot of variables, depending on the size of the vegetables used. I usually get 4 quart jars, but sometimes more or less. Be prepared to make more brine, use more jars, or use the leftovers for something else.
The Vegetables:
100G キャベツ (1 large head napa cabbage) cut into 3″x1/2″ strips
6-8 scallions cut diagonally, 2 inch strips
2 medium carrots, cut into matchsticks
8 oz daikon radish cut into matchsticks ( I don’t use)
1 large cucumber (10 oz) cut into matchsticks
2-3 oz grated ginger root
6-8 oz red fresno peppers, cut into 1″ – 2″ matchsticks
1 tbspn crushed red pepper flakes
Put the vegetables together in a large bowl with room for tossing.
The Brine:
Juice of 2 Yuzu lemons (or 4 limes)
2 tbspns shoyu or soy sauce
2 tbspns mirin (sweetened rice wine)
4 tbspns sake
optionally, 1/2 cup dashi stock (but I don’t..)
Set the brine aside.
The Pickling:
Sprinkle the veggies with 1 tbspn coarse salt. Mix and massage the veggies vigorously until they are well mixed and begin to bruise and lose water, usually about 5 minutes.
Pack the veggies into the quart jars, cramming them tightly with the tamper until you cannot fit any more in the jar. Leave about 1/2 inch head space at the top of each jar. Depending on the size of your napa, you might need more than 4 jars.
Pour a few tablespoons of the brine into each jar, tamp it down some more to release bubbles.
Pour a little more brine into each jar, until the veggies are nearly covered. You may need to make more brine to make this happen. Tamp down some more until you see no bubbles rising through the veggies. This provides an anaerobic environment for this mild fermentation.
Place the followers on top of each jar and lightly screw on the caps. This should hold the veggies completely beneath the liquid. If not, add more brine until the followers hold the veggies under the brine. If you run out of followers, I have used small plastic ziploc bags with water to do the same thing. Important: Allow the tops to be lightly screwed on, in order for brine to escape if need be, otherwise, the jars could break.
Place the jars in the refrigerator, on a plate, or bowl to catch any happy brine that overflows and tries to make friends with your other food.
You can begin eating pickle this right away or wait for stronger flavor. I have stored it in the refrigerator for several months. The longer you keep it, the spicier and more fermented it will get. If you don’t eat it by 3 months though, I would toss it and start over.
Also: Sometimes I save the brine that gets left in the jar after I dish out the pickle, filter it through some cheesecloth and reuse it in my next batch. This considerably speeds up fermentation, so be careful.
Fall off the Bone Smoked Ribs

For best results, begin prep at least three days before you want to eat.
1 rack of St louis style pork ribs (spare ribs)
2 cups Don’s amazing Kansas City Rib Rub
6-8 ounces prepared yellow mustard
1 cup apple cider
8 oz wood chips for smoking
Charcoal for smoking
A smoker
A slow cooker
Heavy duty aluminum foil
- Rinse the ribs, pat dry, and remove the membrane from the underside (concave side).
2. Cutting the ribs into sections of 4 or 5 ribs at this point can make them easier to handle.
3. Apply a smear of yellow prepared mustard to all surfaces of the ribs, then coat with the dry rub.
4. Place the ribs in a plastic bag and refrigerate at least overnight, up to two days
5. Soak 8-10 oz wood chips in warm water for at least 24 hrs.
6. The day you smoke, remove ribs from the refrigerator and allow them to reach room temperature prior to smoking.
7. Prepare the smoker to achieve 225 F (108C).
8. Boil 2 gallons of water for the water pan in the smoker.
9. Once the heat is achieved, place the ribs on the highest rack in the smoker, being careful not to overlap.
10. Once the temperature has stabilized again to 225F, place half the wood chips into the coals in the smoker.
11. Once the smoke subsides, and temperature is 225F again, add the remaining chips.
12. Smoke at 225-250F for 3 hours.
13. Remove ribs from smoker, wrapping each section tightly in it’s own heavy duty aluminum foil.
14. Place them in the refrigerator overnight.
15. Prepare a slow cooker (crock pot) for medium heat.
16. Open each foil wrapped pack of ribs and pour a few tablespoons of apple cider inside.
17. Re-wrap tightly and place them in the slow cooker, low heat 170F (76C) for 6-8 hours.
18. Test them to see if they fall off the bone. Allow a little more time if they need it.
Voila!
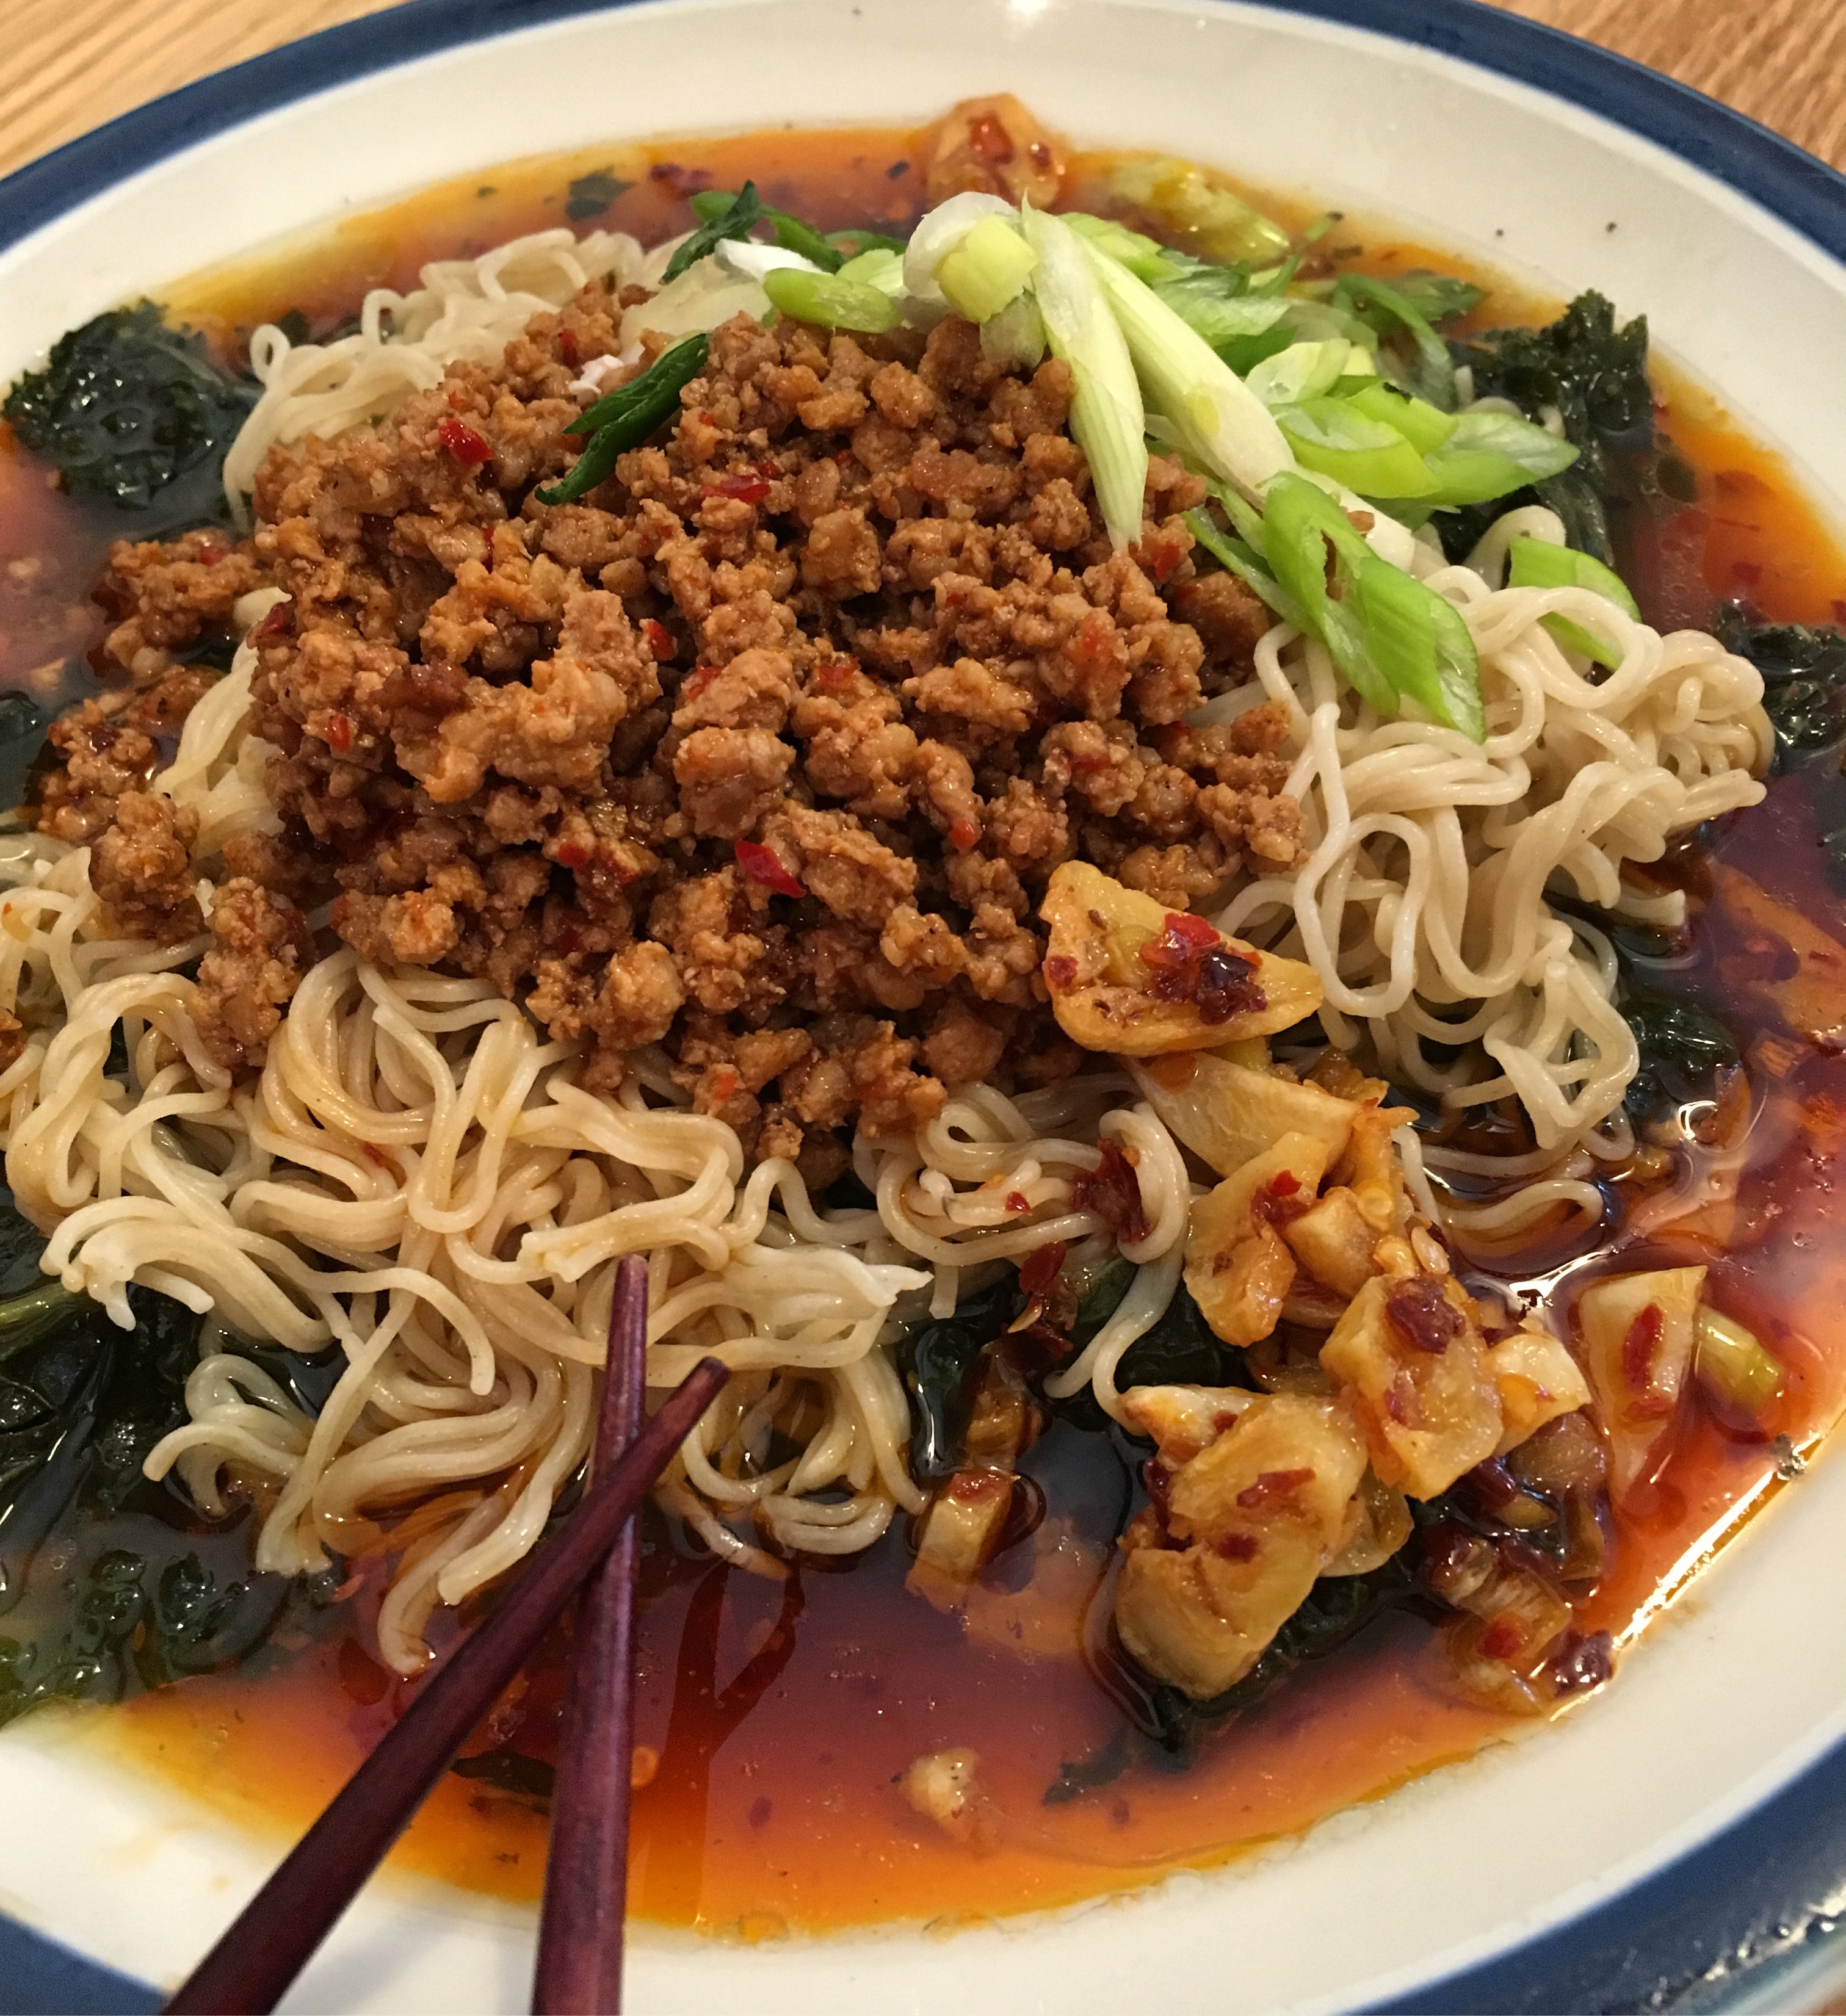
Tantanmen
Tantanmen is what noodles were meant for. Garlic, hot pepper oil, pork, onions… Come on!
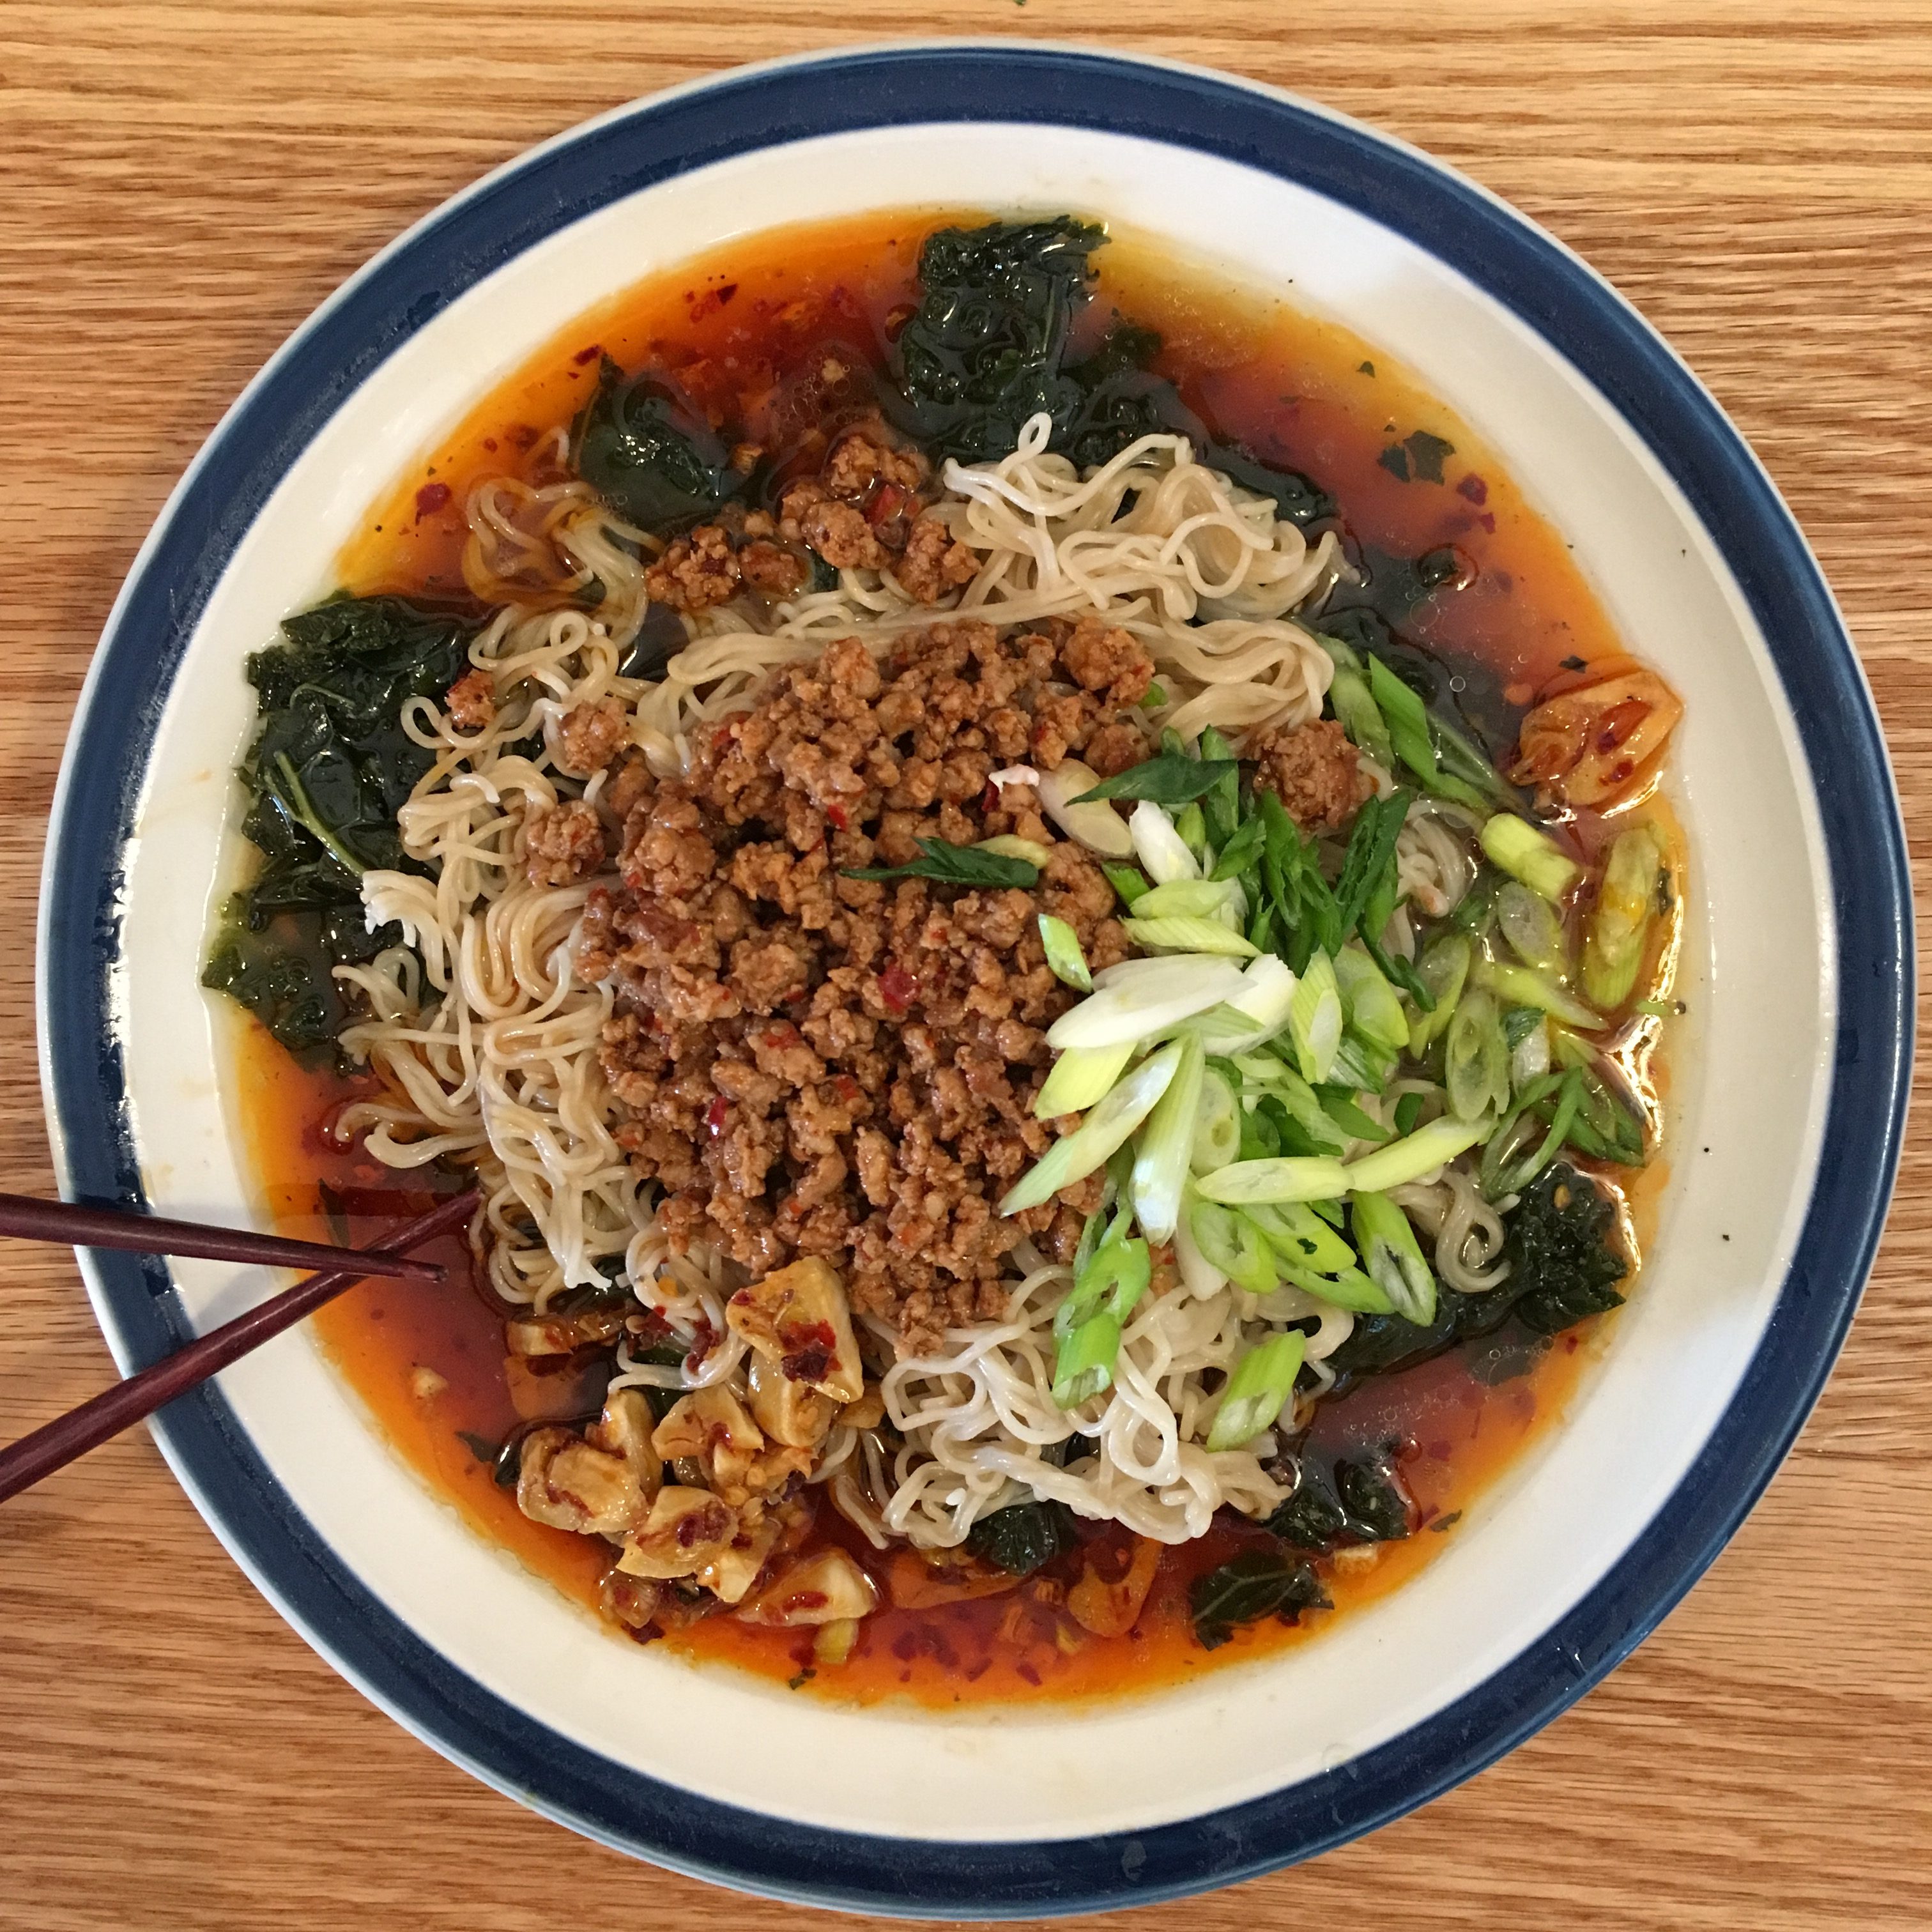
This is one of those dishes that has been around so long, there’s a bunch of variations of it. What follows is the recipe I like the most. It serves two:
Ingredients:
2 cups chicken broth
2 servings ramen noodles (we used rice noodles to be gluten free..)
2 tsp sesame oil
2 tsp rice vinegar
3 tbsp shoyu
4 tbsp tahini
2 tsp hot chili oil
2 cloves of sliced garlic
1/2 lb ground pork
4 tsp sake
2 tbsp shoyu
2 tbsp tobanjan (sweet bean sauce)
3 scallions, sliced diagonally
2 cups spinach or kale
The Pork – Pre-heat a wok with teaspoon of sesame oil. Mix the sake together with the ground pork and saute until cooked through. Add the tobanjan and shoyu to the pork, set it aside.
The Sauce – Saute garlic in the wok with a little sesame oil for about 2 minutes. Put the garlic, sesame oil, tahini, rice vinegar, soy sauce, cooking sake and hot chili oil together in a bowl and set aside.
The Broth – Cook the spinach or kale in the chicken broth until tender, then put to one side.
The Noodles – In a separate pan, cook your noodles al dente (3-4 minutes for ramen usually.)
Plating – Start with the spinach and broth, adding it to a wide low bowl so you can display it well. Be careful not to put too much broth or else you won’t be able to move the bowls. Next, place the ramen atop the spinach, leaving a bit of a flat spot in the middle. Next spoon some of the pork in the middle. Next, add the scallions.
Finally, drizzle with the hot chili sauce. OISHII!

Ochazuke
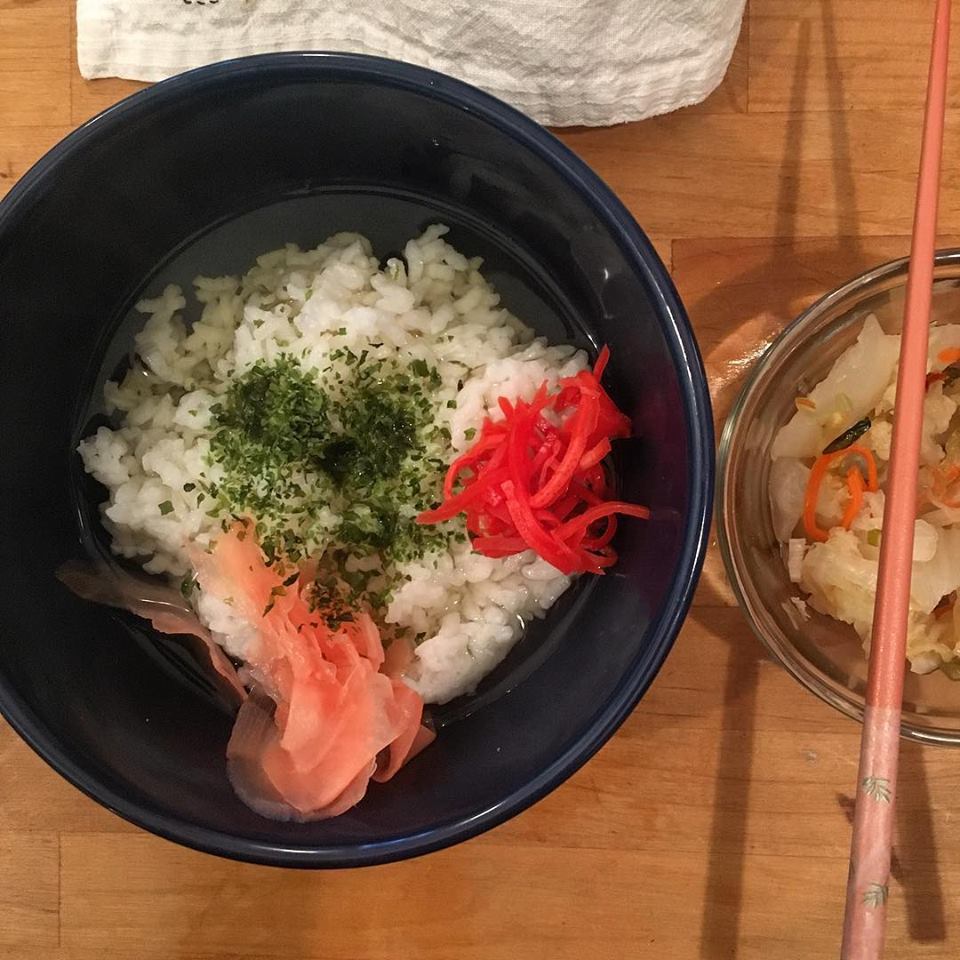
Ochazuke is a Japanese dish – “Ochazuke” translated to English would be something like “submerged in tea.”
Ingredients:
1 1/2 cups cooked white rice
1 cup hot Japanese green tea, brewed (Sencha works well)
Assorted Tsukemono (Japanese pickled things)
Sprinkle of Aonori (crumbled seaweed)
So simple! Place the rice in a bowl, pour the tea over it and top with your favorite pickles, aonori and perhaps some fish or eggs. Your call!
Making Kimchi and other fermented foods
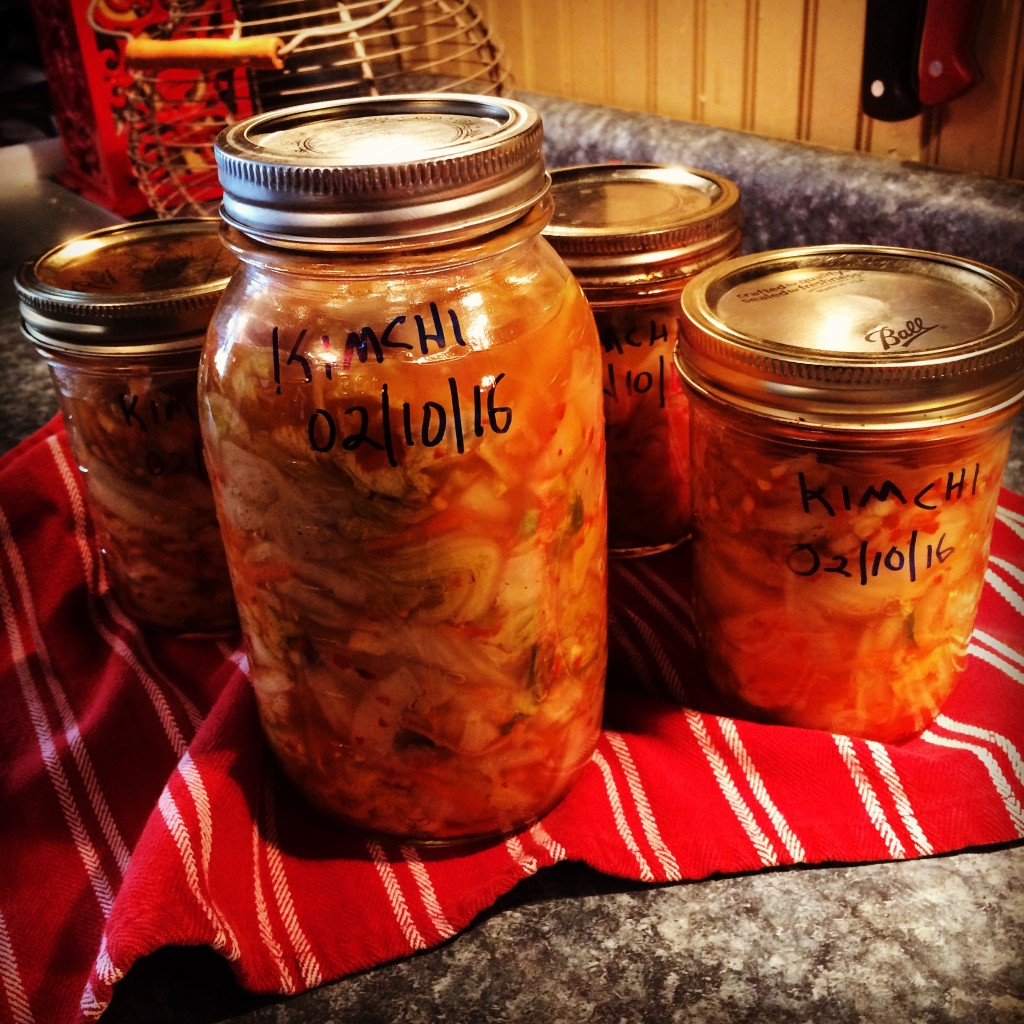 Homemade Kimchi
Last summer we had the good fortune to visit relatives living in Japan. For ten days, we toured Tokyo and Kyoto together. We visited countless temples, restaurants. Saw amazing sites and ate some of the most amazing cuisine I’ve ever tasted! There are many reasons that Japanese live extraordinarily long healthy lives, not the least of which is the food they eat: Traditional Japanese meals heavy on the vegetables and are naturally gluten and dairy free. Another thing we noticed was a variety of fermented foods are usually present at EVERY meal, especially breakfast.
This ancient tradition seems likely to have come about as a means of preserving the harvest, but as many in modern times are beginning to realize, the bacterial cultures present in fermented foods have many benefits in terms of digestion, immune system health, detoxification and even increased mental clarity.
As soon as we got home, we began incorporating more fermented food into our diets – store-bought saurkraut, kimchi and pickled radishes.
A few months after we got home, we bought our first crock and began fermenting things for ourselves. Kimchi is my favorite because it’s spicy, but a nice bit of saurkraut is great as a side dish or in a sandwich as well. I like that we can know where things came from, how they were handled and get to participate in this ancient, wise tradition from my heritage.
Traditional Korean kimchi can contain seafood or meat as well, but we decided to keep it simple. This batch is mostly napa cabbage mixed with some carrots, green onions, garlic and hot peppers allowed to ferment under a brine. Since the vegetables are kept completely covered with brine, not in contact with air, the usual mold and other bacteria that can appear on foods is not able to survive the saltiness and lack of oxygen of the brine, allowing lacto-fermentation to commence, which produces that healthy gut-flora bacteria we all need more of in our diets. (something the yogurt industry is trying to leverage as well, but be careful not to eat yogurt which has sugar added – it counteracts the health benefits of the lactobacillus bacteria by promoting unhealthy bacteria in your system instead!)
Now that our crock is empty again, my thoughts are turning to red onions. Who doesn’t love a nice dollop of pickled onions on their burger?
Gluten Free Recipe: Shanghai Cabbage
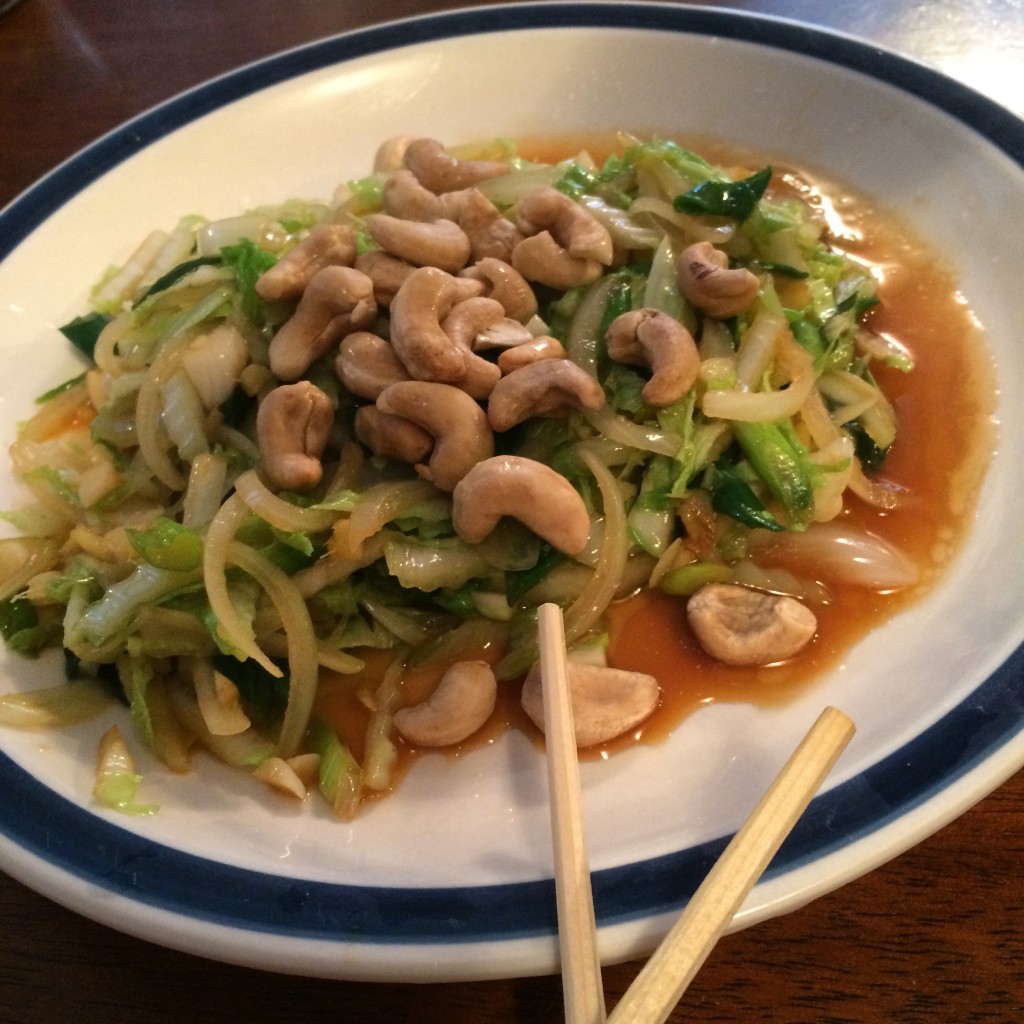
Gluten Free Recipe: Shanghai Cabbage
This recipe is a gluten free version of an old Asian noodle dish called “Noodle Mountain.” I guess you could use rice noodles, but we decided to make it even cleaner by eliminating the noodles all together. As with a lot of Asian recipes, it’s also vegan and dairy free!
Serves 2
Prep time: 20 minutes. Cooking time: 10 Minutes
Ingredients
- 1/2 head Napa Cabbage, sliced really thin
- 1 large yellow onion, peeled, sliced really thin
- 1 bunch Nabuchan Onions or Green Scallions, sliced diagonally 2″
- 1″ Ginger Root, peeled and diced
- 6 Cloves of Fresh Garlic, peeled and diced
- 1/2 cup raw, Unsalted Cashews
- Juice of 1 Fresh Lime
- 1/8 cup Nama Shoyu or Japanese Soy Sauce
- 3 tablespoons Rice Vinegar
- 1/8 cup Toasted Sesame Oil
- 1/4 cup Peanut Oil
Recipe
Make the sauce: Combine the Nama Shoyu, Rice Vinegar and Toasted Sesame Oil in a small bowl. Set aside. Juice the lime into another small bowl. Set aside.
Add 1/4 cup peanut oil to a wok over high heat. The pan is ready as soon as a water drop disappears when you flick into the oil. Quickly add the yellow onions and turn down to medium heat. Saute` the onions until they are translucent, and remove from the pan to a plate.
Bring the pan back up to high heat again and add the cabbage, green onions, ginger and garlic to the pan and toss as you would a salad with tongs or two wooden spoons, until all the cabbage is limp, usually about 5 minutes. Add the yellow onions back in along with the sauce and heat through, about 2 more minutes.
Quickly remove the cabbage mixture to two plates, top with the cashews and lime juice – This tastes best when it’s good and hot.
We like to eat it with chopsticks because it forces us to eat slowly.
Enjoy!
Window Salad
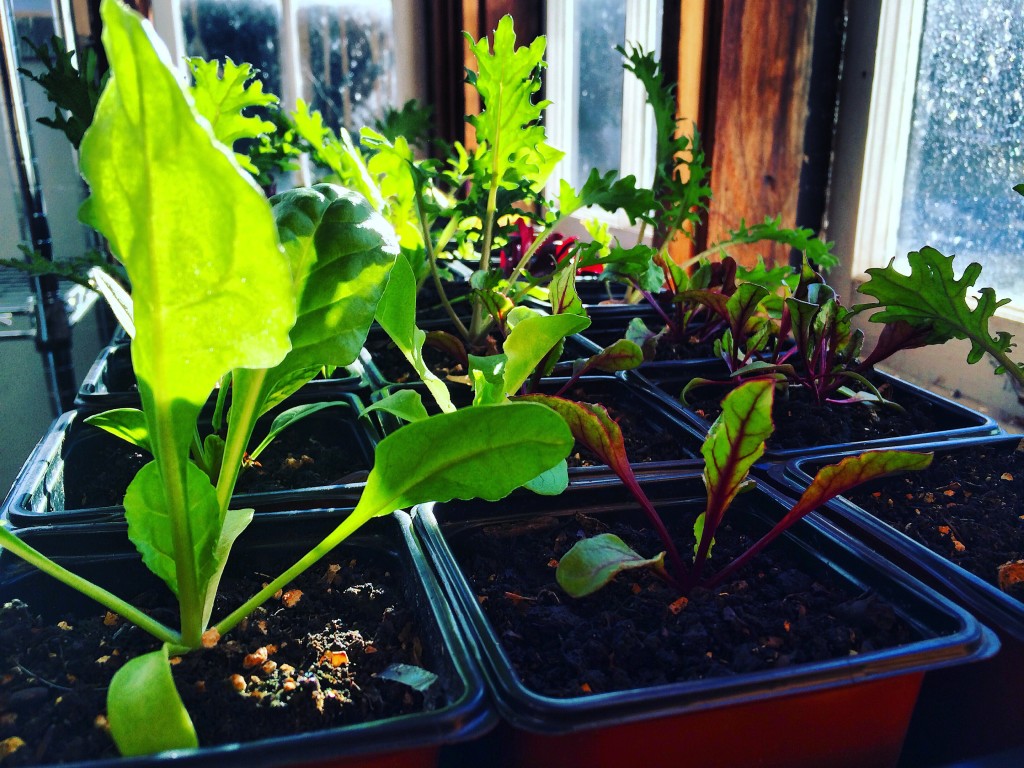
Kale, beet, chard, lettuce, spinach microgreens growing in a window box here at the farm in December.
When the weather here in New Hampshire keeps us from growing food in the ground, we turn to the window sills. With the current setup, we don’t get a lot of food from it, but it helps us evade the winter blues that come from totally being cut off from our agricultural bent.
Piccalilli Egg Salad

Piccalilli Egg Salad
This sandwich is made from our farm fresh eggs, homemade paleo mayonnaise, Abigail’s Millet and Sweet Brown Rice bread, and my sister’s piccalilli.
I know. Egg salad?
But this was so good I had to post it!
side note: (In case you are allergic, Abigail’s bakery bread is not certified gluten free, but there’s no wheat in the ingredients list of the Millet and Sweet Brown Rice Bread.)
Recipe:
- 2 hard boiled eggs, fresh from the farm
- 2 tbsp mayonnaise, fresh from the farm
- 2 slices of your favorite bread, buttered, grilled
- 2 tbsp of my sister’s piccalilli
I think you can figure out the rest…
The only way I’ve ever tried piccalilli was on baked beans. Now I guess I will have to experiment using it as a condiment with a mess of other foods. Thanks Sis!
Also you might like:
Vegan Egg Salad
Deluxe Egg Salad
Bacon Wrapped Egg Salad (Just kidding)
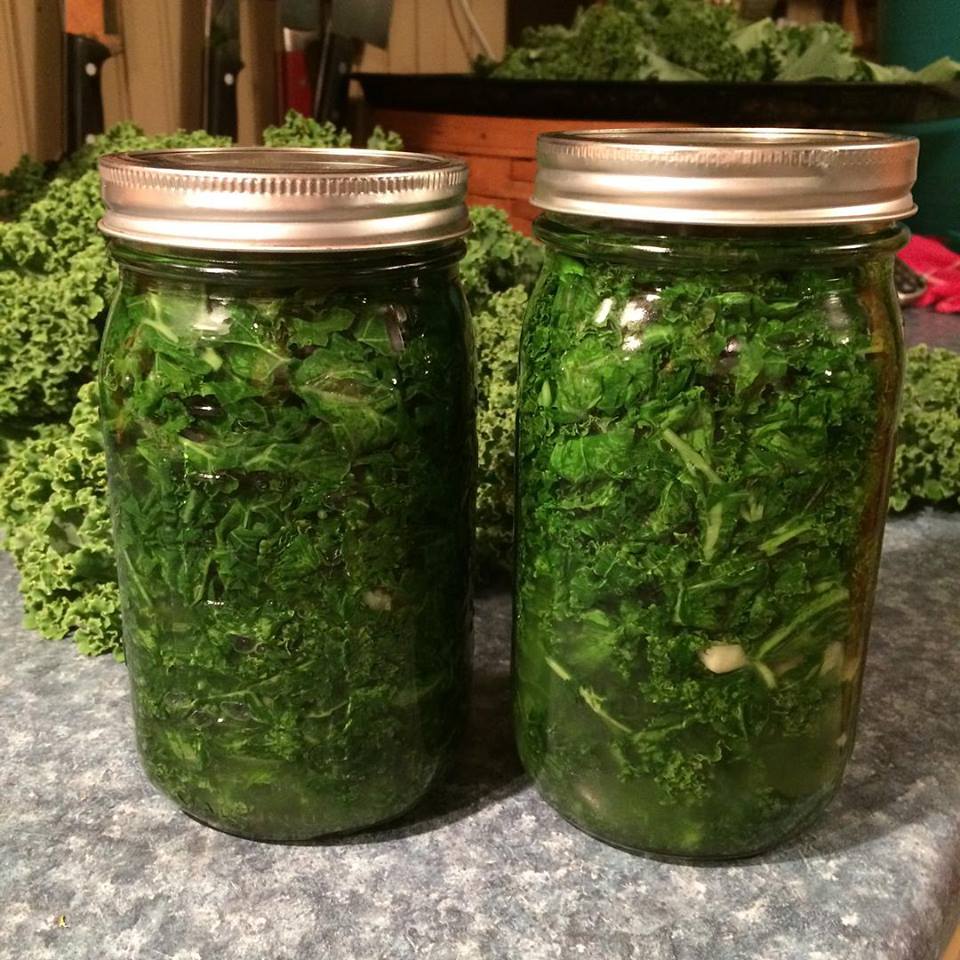
Fermented Kale Recipe
A recent trip to Japan has given us an even greater appreciation for fermented foods. In Japan, fermented foods are called: “Tsukemono” or pickled vegetables. We knew from other reading on the subject that fermented foods are very beneficial because they provide the gut flora needed to break down nutrients more efficiently, which means we experience greater digestive health, immune health and even benefits in terms of cognition and energy; but Japan’s ancient lineage and the fact that Japanese people have the third longest life expectancy of any nation is enough to make us consider the deeper wisdom of their most obvious daily routines. In Japan, fermented foods are served at every meal, especially at breakfast.
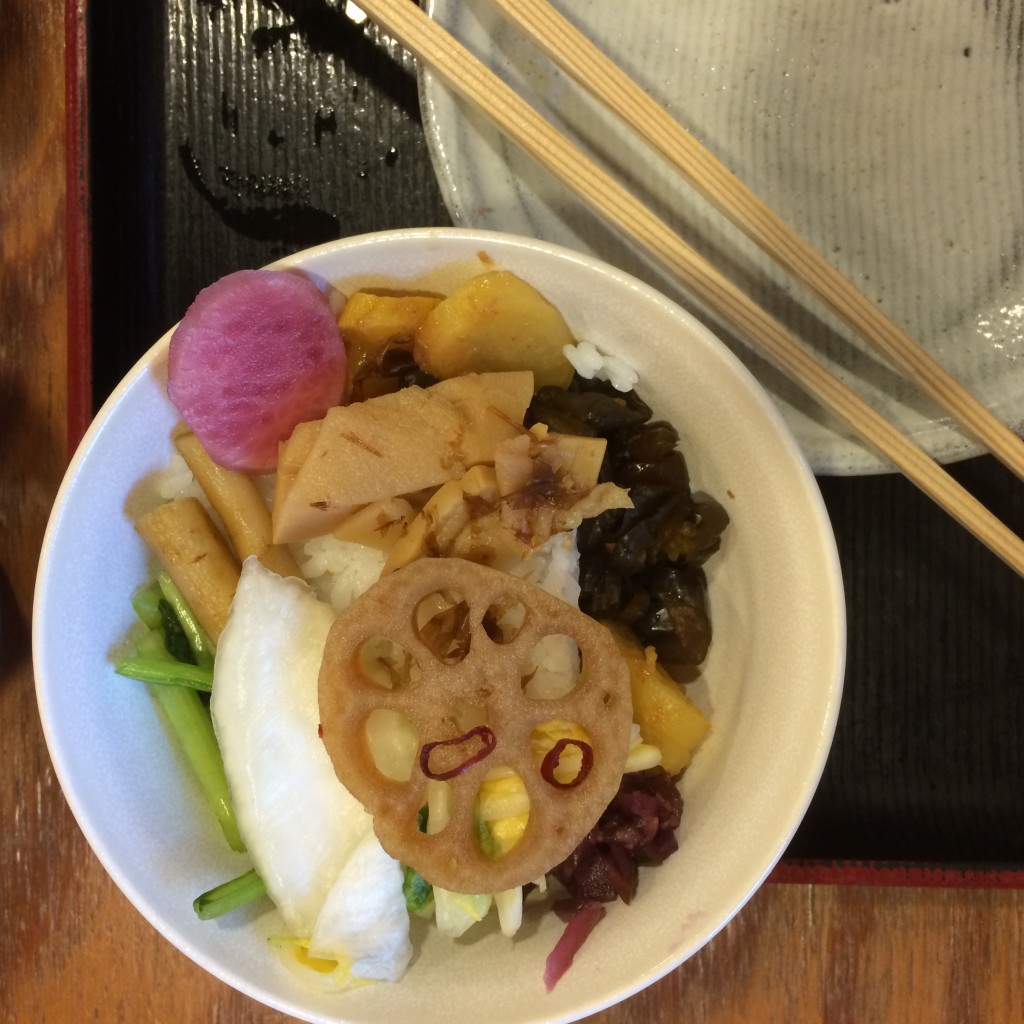
Above is a lunch meal we had in old Kyoto – Ochazuke which means “soaked in tea.” This bowl starts with a bed of white rice made with green tea, and then any number of fermented veggies on top. In this picture: Lotus root, Mizuna, Daikon, Bamboo, Rhizome, Button mushroom. Despite the 100F heat and 85% humidity, it made m,e feel energetic and ready to take on bigger things. It’s worth noting that in Japan, when you eat with others, there is also a deeper significance than just taking on nutrients in the same room. It’s hard to explain but the Japanese have discovered that not only are there tremendous health benefits to fermented foods, but there’s a social aspect to dining together; a resonance, that fills you in other ways.
Back to fermented kale. Here’s a recipe. Pretty basic with a bit of trickiness. Ideal fermentation varies based on conditions where you dwell.
Here in new england:
Ingredients:
12 oz kale leaves, stems removed
2 or 3 garlic cloves, peeled, crushed
2 tsp salt
Take a quart mason jar and put it in boiling water in a pan, enough to cover the jar. Boil the jar and lid for 10 minutes.
Wash the kale well in a salty bath and then strip the kale from it’s coarse stems, place the leaves in a very large bowl and sprinkle with the salt.
Put 2 quarts of water on to boil.
Massage the kale in the bowl with your hands 4 or 5 minutes. The kale will assume a color and texture like seaweed.
Scoop the kale into the jar and pack down lightly, leaving 1/2 inch head space. Using a ladle, fill the jar with boiling water until the kale is completely covered in liquid. Screw on the lid on loosely, just one turn or so, leaving room for the fermentation to push by the lid. As the kale ferments, it will bubble over. If you seal the jar tightly, it could explode.
Set the jar in a dish or something, to catch the overflow as it bubbles over. The fermented kale is ready to eat when you see some evidence of bubbling over, usually 3-5 days at room temperature.
This recipe is decidedly vague. It’s varies a bit depending on your climate. The cool thing is, with very little effort, you are developing a stronger digestive and immune system, time tested and proven, using one of the oldest low tech means possible.
You could also add crushed red pepper or Toragashi (Japanese 7 spice). Your call. Experiment! Explore!